
If you are offended by the human body nature gave us, skip this lesson.
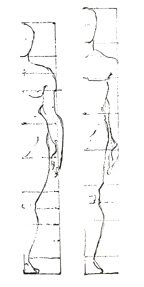 The illustrations above are general proportions. Everyone doesn’t fit the same figure, and bending of the body will throw off the measurements.
The male body has wide shoulders and smaller hips while the female body has smaller shoulders and wider hips. The head is shaped like an egg.
The center of gravity goes through the pit of the neck to the supporting foot or feet. The drawing of an active figure needs a sense of security.

If the shoulder is lower on the right side, the hip will be higher on that side and the weight will be on the right leg to support the body, the other leg will be slightly bent. If the shoulder is lower on the left side of the body it will be reversed.
 In order to get the feeling of motion in your drawing, be relaxed and swing with your pencil. In time you will be able keep your figures in balance. Practice as below.
 Make quick rough action sketches of people you see on the move, get the rhythm of their motion. You don’t have to finish them.
 In time you will be able to vary the weight of a flowing or rhythmic line, weaving it about the form. On the shaded side of the body press heavier on the pencil and softly on the light side. This will give your figure appear to be three dimension.
Practice, practice, practice!
Practice, practice, practice!


No comments:
Post a Comment