Updates

For updates, see sidebar on the right.

FREE Art Lessons

We will begin by touching on various aspects of drawing: seeing with the artist’s eye, values, creativity, abstraction, armchair research and where to go from there. The goal is to encourage your artistic abilities. It will be a journey of discovery.

Introduction
It is time for me to pass on what I have learned from my years as a lifelong painter and illustrator, because I have had a wonderful life doing what I love to do.

I have traveled the circuit as an artist, from traditional through impressionistic, from exploration of imaginative cosmic space to atmospheric-nautical with ink, paint, and pastel. In my late years I now use the computer as my art tool. I wrote, illustrated, and published my first book “Keeping Ahead of Winter” after I was eighty-years-old.

I taught oil painting at the San Mateo County Arts Council and taught drawing in my studio at the Twin Pines Art Center, in Belmont CA., now called 1870 Art Center. My work is in the permanent collection of the Peninsula Museum of Art.

Leonardo Da Vinci wrote, “The feeling is what guides you to reach out for the knowledge.”

You will need:
· A medium size drawing pad (if you are just starting to draw, buy a newsprint paper pad -- it is cheaper and you will be more relaxed)
· Number 2B, 4B and 6B drawing pencils
· A pocket knife
· Ruler
· Kneaded art eraser
· Charcoal or conte crayon optional
· An Emory board or a small piece of sandpaper stapled to a piece of wood to shape the point of your pencil
· A drawing board, or use plywood or Masonite
. Masking tape to hold your paper on the board
· Fixative to protect the drawing from smearing (hair spray will do the trick)

Art materials can be bought at your local art store or online at: Dick Blick http://www.dickblick.com/ or Daniel Smith http://www.danielsmith.com/
~~~

TO COMMENT: You do NOT need a Google ID. Select any of the other options presented and follow instructions.

Thursday, August 28, 2008

Lesson #1

All of us at one time have had the urge to create pictures. There are no magic rules to be laid down for drawing. Drawing is not a precise science. It is the ability to express one’s own impression.

The arts are not restricted to professionals and geniuses. There is something about art that brings serenity to one’s life.

Drawing is as individual as handwriting. Most people only look; as an artist you must learn to see. You have heard it called the artist’s eye.

If you are an advanced artist you may find ideas here that you haven’t thought of. Sketching is a way of life that leads to better painting.

Seat yourself comfortably at a table. Hold your pencil as shown in the illustration. Use your arm rather than your fingers to move your pencil. This will give you more freedom of motion. Sit in a straight back chair in front of a table. Rest the drawing board on an angle. You can rest it on your lap leaning against the table or tilt the board on an angle with a box under it. Use masking tape to hold your paper on the drawing board.

Practice free flowing lines by filling a sheet or more of paper using number a 2B pencil; lift and press on the pencil while you write large letters of the alphabet in longhand. Use your wrist to move the pencil rather than bending your fingers.


The nature of these marks and the total effect of their fluidity will establish both style and tone of your drawing. Experiment with different size pencils.


To get a good point on the softer pencils hold a penknife in one hand and guide the pencil with your thumb of the other hand as shown in the picture.

Choose a room that is painted with one color. Look where the light hits the wall. See how much lighter the color of the wall is where the light hits it. Now, look where it meets the ceiling. See how much darker the ceiling looks than the wall. Next, look around the walls of the room at the different shades of gray.

Turn off the light or close the drapes and the walls appear darker. If there is no light at all, everything appears black. What color is it inside a watermelon before we open it? It’s black. The same with the refrigerator -- it is black inside when the door is closed and light when the door is open.

Once you have a fairly long point, rub one side of it on sandpaper to flatten it as shown in the photo and illustration .


Practice values with the different weight pencils and strokes.
To master drawing a straight line without using a ruler (although there is nothing against using one), follow the simple exercise below:

Your eye will tell your hand what to do. For example, to draw a straight line put a dot on the left side of the paper and another on the right side. Place your pencil on the dot on the right side of your paper. Do not look at the pencil; look only at the other dot and bring the pencil over to it.

Your homework is to work on these simple exercises. Sign, date and keep everything you do no matter what it looks like -- that way you will be able to watch your progress.

Every drawing you do will have some good in it. Learn from what you do well. Practice, practice, practice, before you go to the next lesson.


I look forward to your comments and questions. Click on "Comments" below.

Wednesday, August 27, 2008

Lesson #2

I have traveled the circuit as an artist, from traditional through impressionistic, from exploration of imaginative cosmic space to atmospheric-nautical with ink, paint, and pastel. In my late years I now use the computer as my art tool. I wrote, illustrated, and published my first book “Keeping Ahead of Winter” after I was eighty-years-old.

I taught oil painting at the San Mateo County Arts Council and taught drawing in my studio at the Twin Pines Art Center, in Belmont CA.(now called 1870 Art Center.) My work is in the permanent collection of the Peninsula Museum of Art.

~~~

Leonardo Da Vinci wrote, “The feeling is what guides you to reach out for the knowledge.”

Start drawing something simple; such as a cup, a box or an apple.


If your eye level is above the vase; the top will look oval. You will see all around the top of it and the bottom of the vase will arch down. If you are looking up at the vase the top will arch up and the bottom of the vase will look straight.

Shine a bright light on it from one side. Squint your eyes and study the shadows; notice the darkest is next to the lightest followed by the medium values; and lightly draw their shapes with your pencil.

When you are satisfied with what you have drawn; fill in darkest value first and gradually work in the lighter values. The shadows will be on the opposite side of where the light shines

Next draw a bowl of fruit, or a vase of flowers. Start by making light guidelines. To match both sides of the vase you can hold a ruler perpendicular in front of it.

If you want to draw flowers don’t sweat it, they don’t have to be accurate.

Outline the whole shape if you have a grouping of objects for a still-life. Within the outline draw a preliminary sketch of the objects. After you have done that go into the detail.

To measure one object against another, squint your eyes. While keeping your arm parallel to the floor hold a pencil perpendicular.

While you are drawing, move away from your drawing from time to time to look at it from a distance and you will see the drawing better. Some artists like to view their work in a mirror.

Have a good time. Don’t be timid about your work. It is good to be fairly accurate and be bold, throw lines on the paper. In time, with concentration you will create wonderful drawings.

If you don’t feel the light is bright enough on your drawing you can use white chalk to brighten the part where the light is the strongest.

As a caution at this time I recommend you don’t show your work to family members or anyone who is not an artist. It is too easy to become disheartened. I learned that by experience.

There are famous artists who have been told after a couple of weeks to “give up art.” So don’t be discouraged over your first hundred drawings.

Always carry a small drawing pad and pencil with you to make sketches of something or someone you see. There will be times when you will be waiting for a late friend, or in a doctor’s office, or waiting at the airport. The wait won’t seem so long.


On an all purpose pad about 5”x 8” while waiting in the car for a friend I used the time to draw the scene that I saw from the car window.


Act ~ Risk ~ Do!

Make quick sketches. Accuracy is a waste of time. Show the essence of the idea. The more you practice the better you will be. Everyone is different -- in experience, background and emotion. Never mind if your work doesn’t look good. It takes time and you learn from everything you do.

As an exercise, study paintings by famous artists. Copy or trace shadows from a master painter’s painting and the picture will show itself. Here's a Rembrandt tracing:
Happy drawing. Before going to the next lesson work on these exercises for at least five hours
Let me hear from you if you have questions or comments.

Tuesday, August 26, 2008

Lesson #3

The simple study of perspective is meant only to be a guide in a way artists see. If you are advanced and want to do complex, detailed work, check the library or Dover Publications on the Internet at: http://store.doverpublication.com/by-subject-art.htm.

The following is a way of seeing. Objects close to you will look larger and darker and in more detail than those in the distance.

All vertical lines are perpendicular to the horizon line (sometimes called the line of sight.)

Eye level is the height at which your eyes observe an object; sit and you will see the bottom of an object, stand and you will see the top.

Pictures need a horizon line (line of sight at which your eyes observe an object) it is best to have it either above or below the center of the picture.

VP stands for vanishing point.


If you don’t have all the materials I recommended, draw anyway with whatever you have. When I want to draw I will draw on scraps of paper, or even on a newspaper, and with any kind of pen or pencil.

Besides the drawing of pictures, drawing is useful in most business: science, architecture, mechanics, plotting, designing, geology, graphics and charting to name a few.

My doctor was trying to explain a problem I had that I didn’t comprehend. She drew a picture and it clarified my understanding.

The perspective drawing shows telephone poles and railroad tracks.
Use cheap paper to do these training exercises.

These guidelines are to help you see simple forms that can be used to develop more complicated detail. They are the beginning of drawing -- like learning the alphabet.

In time your eye will be trained and you will be able to picture in your mind the guidelines.

Free hand perspective drawings are done on scraps of yellow paper.

Keep practicing strokes. Relax and let your lines flow.

You don’t have to start out drawing the Grand Canyon -- a weed in the sidewalk will do.


It is important to draw what you see and discard what your intellect tells you it should be. Trust your eyes more than your brain.

Try to practice an hour or more every day.

Enjoy what you are doing and let me hear from you so I will know what your interests are.

For the next lesson you will need tracing paper. If it’s not available you can use tissue paper.

Monday, August 25, 2008

Lesson #4

Your work should balance as a scale. The dark shades are heavier than the light.

Good draftsmanship is a necessary condition for good drawing

Have the light shine over your left shoulder, so that it won’t shine in your eyes or cast a shadow on your work from your hand.

Notice how the eye travels around a picture to the focal point,(the focal point is what draws the viewer into the picture.)

If you have trouble deciding what to draw; it is because you have too many ideas. Draw the fist thing that comes to mind. If you don’t like what you did, don’t dwell on it, go to your next idea and think about what drew you to the scene in the first place.

Date your sketches and keep them so you can watch your progress.

Everyday things may be mundane to you and exciting to your neighbor. A house can mean safety and comfort to one person and revulsion to another. Trust your feelings, it will show in your work.


You see something that has caught your emotion, whether it is the Grand Canyon or a broken flower pot. Think about the first moment you saw it. What was it that caught your attention to make you linger on the scene? Ignore the details, squint your eyes and look at it again. Zero in on the values and you will have an interesting drawing. It doesn’t have to be exact and you can leave things out or add something else.

Be content with whatever image appears. We cannot directly free ourselves from critics. So try to divert them in order to satisfy their needs by assigning them a job.

You can cut a small hole in a piece of cardboard to look through and see the boundaries you want your picture to be.

If you are drawing a landscape and you want to show the size of a tree, put something in the picture that we are familiar with such as people or a car. This will give your drawing the appearance of size and the relative distance of depth as it appears to the eye.

The astronomer brings facts, the artist steps beyond those boundaries and is motivated by emotion and is able to act free from restriction.

You learn to draw by drawing, so keep up the good work.

Sunday, August 24, 2008

Lesson #5

It is important to understand the structure underneath a clothed figure.

If you are offended by the human body nature gave us, skip this lesson. 
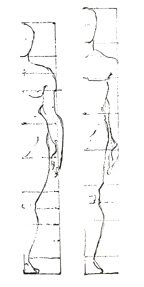
The illustrations above are general proportions. Everyone doesn’t fit the same figure, and bending of the body will throw off the measurements.

The male body has wide shoulders and smaller hips while the female body has smaller shoulders and wider hips. The head is shaped like an egg.
The center of gravity goes through the pit of the neck to the supporting foot or feet. The drawing of an active figure needs a sense of security.

If the shoulder is lower on the right side, the hip will be higher on that side and the weight will be on the right leg to support the body, the other leg will be slightly bent. If the shoulder is lower on the left side of the body it will be reversed.

In order to get the feeling of motion in your drawing, be relaxed and swing with your pencil. In time you will be able keep your figures in balance. Practice as below.

Make quick rough action sketches of people you see on the move, get the rhythm of their motion. You don’t have to finish them.
In time you will be able to vary the weight of a flowing or rhythmic line, weaving it about the form. On the shaded side of the body press heavier on the pencil and softly on the light side. This will give your figure appear to be three dimension.

Practice, practice, practice!

Saturday, August 23, 2008

Lesson #6

It is my intention to encourage your creativity.
Art is a part of all our lives, wherever we go, whatever we see. What we do now tells about the culture of today wherever we happen to be.

For those of you who are experienced in drawing or painting, I hope these classes will add to what you already know.

I will appreciate it if you tell me what your particular interests are.

The illustration shows you the distances between features of the head.

-- Think of the head as being shaped like an egg and draw light lines as shown on the illustration.
-- Notice that the ear is between the eyes and the base of the nose.
-- To give the illusion of being three dimensional, instead of making straight lines as in drawing a box, make them oval.

For this exercise draw the head straight on. Normally it looks best if the head is tilted and/or turned. After you get the feel for drawing the outline of the head add the facial features.

You will notice that male heads have sharper lines.


When you feel you have mastered the outlines with the facial features, add the values.
While the adult head is oval, the child’s head is more round. The forehead is more pronounced than the adult and the jaw bones, neck and other facial features are smaller.
These pictures of the children are from my book
"Naptime Secrets."

This should keep you busy for now. You will do a lot of drawings before you feel good about them.

Have fun.

Friday, August 22, 2008

Lesson #7

It is time to review the lessons from the beginning before continuing. Good draftsmanship is necessary to becoming a good artist no matter what medium you use. As long as you make the effort to draw, you are an artist.

You can learn to draw well by drawing. Be wise -- plan on drawing at least an hour a day and take your pencil and drawing pad with you wherever you go.


Notice the activity in the illustration above -- it is artists I worked with as we turned a derelict building into workspaces.

You will find it stimulating to get together with other artists by joining art clubs, painting outdoors with friends or finding studio space. If you are homebound, set up work-space, no matter how small in order to have the materials you work with ready at all times. Before I had a studio, I took a corner of the living room to work and I have seen an artist make a workspace (she called it her studio) in a small closet, even though she had to sit outside the door to work.


Don’t tell me you don’t have room. While I was living in a boat I kept my artist’s materials in a box that had an easel. I had to prepare for an art show so I confiscated the bow room to store my oil paintings until they dried. Later, in a smaller boat, I turned to painting with watercolors, and since they are done on paper I was able to store my paintings under the mattress.


Gj asked: “Who are the artists that did the paintings in your blog? I love them.”
Answer: “Thank you for asking Gj. I did the paintings in the different genres over many years. I started studying fine art in 1954. Before then I worked at commercial art. Yes, I’m now very old -- 93 to be exact --well, young old.”

~~~

Next lesson we will work on drawing facial features.

Pastel


Keep up the good work.

~~~

Thursday, August 21, 2008

Lesson #8


Any set of features in a skull can be made into an interesting face. Look at the construction and placement of the features. Both sides of the face balance.The hairline is also important, as is the proper placement of the mouth between the nose and chin. Keep the skull in mind when drawing the head. Combine the values of light and dark and half tones. Study your own face in a mirror and then study anyone’s face you can get to stay still for a few minutes. It is better than copying pictures.
The Eye

  • The eyeball is almost the shape of a ball.
  • The pupils of both eyes must be focused in the same direction.
  • A boney structure surrounds the eye. The pupil and the white of the eye protrude slightly.
  • The upper lid is the one that moves, and when closed it draws smoothly over the eye; when open the lower part follows the curve of the eyeball, leaving wrinkles.
  • The lower lid is somewhat stable and follows the curve of the eyeball and may be puffy under it.
  • The eye lashes protect and shade the eyes.
  • The shape of the eyes and the mouth change with age.


The Mouth
  • The mouth needs to be the right distance from the nose.
  • The teeth control the shape of the mouth.
  • The greater the curves of the lips the fuller and more bow shaped the mouth will be. Below the lower lip the mouth slopes inward -- no matter how thin or thick the lips may be.

The Nose

  • The upper part of the nose is wedged at the base of the forehead and may be varied in shape.
  • The tip of the nose may be elevated, horizontal or depressed.
  • The nostrils may also be shaped and sized differently.


The Ear

  • The ear is shaped like half a bowl with the rim turned out.
  • There is a fatty tissue in the lower part, at the ear lobe.
  • The lower part of the ear toward the face is on a line with the upper angle of the lower jaw.
  • The upper part of the ear is on line with the eye.
  • There is a flap in front of the ear canal.

Be patient with yourself and have fun. Expect this to take a lot of work.

Wednesday, August 20, 2008

Lesson #9

Remember, you are unique and should find fulfillment your own way. In other words, only compete with yourself. An artist’s immediate emotional response captures the essence of a subject.

Put your body into your strokes full swing. Practice with charcoal and different weight pencils. If you have the dark and light values balanced, you are partly there. What you want to do is make an interesting composition. Let your intuition guide you, have an idea what you are going to do and be ready to alter it as you go. You may need to change the light and dark relationships to make the difference.

You will find that fine lines = lightness; heavy lines = drama and weight; curves = gracefulness; straight = forcefulness; jagged = restlessness; long sweeping lines = movement or growth.

Negative space is the background space that can emphasize the important message. The dark background in the picture of the boat below brings the viewers eye out the door to the focal point.


The eye is brought to the flames in the picture below by the negative space which I marked off.


Heavy lines are strong and stiff, while thin lines alone are weak. Rounded lines with the lines up are happy with graceful movement, while rounded lines facing down are sad, such as droopy shoulders or a sad face.


To find the perimeter of what you want to draw cut a see through frame in a piece of cardboard and look through the hole in order to find your view.

When you are doing a landscape take a photo the scene. Do it yourself, so that the picture will be as you see it and it will zero in on what caught your eye in the first place.


I was painting a scene of San Francisco at ten o’clock in the morning and worked as fast as I could. After a few days, the sun was in a different position that changed the light. Unfortunately I hadn’t taken a picture of the landscape and it was a year before I was able to catch the same light to finish the painting.


Dare to try your ideas and give yourself a good time. Value what you do and act on it before it grows dull.

When you sketch someone you know, study the person and when you start to sketch, do it from memory. Make adjustments entirely on your intuitive feelings.

When I studied advertising fashion illustration we had to go downtown where the dress shops were, study a dress in a store window, and go back to the studio and draw the dress accurately and make it look better than it really was. Sometimes we would put a dress on a hanger and draw the dress with a body in it. This was good training. You can do it too, by memorizing something simple. Then draw it without looking at it until you are finished with the drawing. Don’t expect to hold more than one image in your memory. It is something that not even the most brilliant imager can do.

Make light lines as a guide on the canvas or paper before you start your drawing, so you don’t lose some of the subject by cutting off the top of your picture (maybe someone’s head.) Hold off on detail until the very end. Hold your eye to the design and don’t wander of the edge of the page.


Would you want this to happen to your masterpiece?

Perspective is an optical illusion, it makes the appearance of three dimensions on a two dimensional surface, but rules don’t make a composition or artistry.
I have previously touched on the study of perspective to get you started drawing right away. In time I will recommend more detailed study of perspective.

Don’t worry about following a rigid path. Let your drawing unfold -- just let it happen. See that there is balance to your drawing.

A quote from Edward Manet, “Paint is what you see at first go. Everything else is padding.” This pertains to drawing as well as painting.

Good draftsmanship is necessary towards the use of any medium.

I hope you realize that I am giving you simple basics of drawing to get your juices flowing. You may want to take your art further. In a coming lesson I will direct you to where you can expand your knowledge of drawing.

Tuesday, August 19, 2008

Lesson #10

Color is energy -- it affects the human body, mind, and spirit. Size affects color and opposite colors will accent one another.

Check art supply catalogs to learn about the different mediums and decide whether you want to use colored pencils, crayon, watercolor, oil, or acrylic. Catalogs explain about the different mediums. You can also get good information by going to manufacturers of art materials on the Internet.

To paint in any medium you need to know something about color. Most of you are familiar with the color wheel. The basic colors in the color wheel are red, yellow and blue. If you mix red with yellow you get orange; yellow with blue you get green; blue with red and you will get purple. You can get by with using these few colors plus black and white.

It is good practice to mix the colors yourself, but it isn’t necessary.
Paint companies offer an abundance of beautiful colors, as well as a large quantity of fine paper with textures from slick hot-press to extreme roughness. Experiment with them to find the ones that are right for you.

Don’t let the lack of paper keep you from drawing, draw on anything -- a paper bag, newspaper, or a box. A wrinkled piece of paper may even provide an interesting surface.

It is easy to get enwrapped in what you are doing and forget to step away to see it at a distance. If you stand or lean against a high stool when painting, you will be more likely to step away often, to get a better perspective of your painting.

If an accidental mishap occurs, it may be your best friend. Take advantage of it and make adjustments with your intuitive feelings.

Frame your drawing with a mat to see how much better your picture will look.

In the event you are stuck for an idea, do something different -- read art magazines, a book; go for a walk; or revise older work. When you stop thinking about it, the solution will come to you.

Don’t belabor an idea -- keep reaching and experimenting. As the mind wanders, new theories are born. A color or sound, or a feeling may spur a thought.

I keep National Geographic Magazines in case I need to know how something looks that I have never seen.

Monday, August 18, 2008

Lesson #11

We all see things differently. No two painting will be alike if a group of painters all painting the same thing. For example: do you see a young woman in the picture below or an old woman?

In my early years of painting I didn’t understand abstract works and yet I was an admirer of Salvador Dali. He was a good example of the necessity to understand drawing basics.

I studied abstract painting under Professor Carl Lindstrom who was teaching at the de Young Museum in San Francisco. Lindstrom set up a group of different colored glass vases in front of a white curtain and threw a bright light on the vases that reflected colored rays of light on the curtain. There were approximately 100 students in the class and every painting was different.

For abstract painting you need to get into the frame of mind similar to doodling. Whatever you do viewers will see it differently than you. They may see faces, body parts, animals, ghosts or whichever way their imagination takes them. Let your subconscious have its way and you will keep improving your visual perception

Once you have doodled on your paper or canvas, check it out for balance. You may see things in it that you can emphasize and turn your abstract painting into an abstract surrealism.

Keep what you have done whether you like it or not. I have found that often paintings I did that I didn’t like were often the ones that sold first.

________________________________________________________

We draw as a means of communication. There is more to drawing than fine art. Drawing helps record what words cannot. Much is learned from drawing. We make charts, diagrams, maps, graphs, mathematical formulas and use drawing as a teaching tool.

The book “Thinking with a pencil” by Henning Nelms, (unfortunately out of print) tells of ways to use drawings in your work and in your hobby.
Not good drawing, but enough to get ideas across. Many years ago I wanted to make a dress pattern from scratch. I went to a number of pattern making classes and all of them, said to copy a ready made pattern and make needed changes. I was thumbing through “Thinking With A Pencil” and found an illustration of a pattern that showed the degrees of angles needed to make the pattern from scratch that I wanted…

For those of you who are interested in more study, there is a wide range of how-to and inspirational magazines and books whether you paint with acrylic, oil, watercolor, pastel pencil, ink or use mixed media. I recommend the following:

Books of interest for further study:
ART STUDENTS’ ANATOMY by Edmond J. Farris, Dover Publisher.
PERSPECTIVE FOR ARTISTS by Rex Vicat Cole, Dover Publisher.
COMPOSITION, A painter’s guide to Basic Problems and Solutions by David Friend, Watson Guptill Publications.
BRIDGMAN’S COMPLETE GUIDE TO DRAWING FROM LIFE, by George B. Bridgman, Weathervane Books.
THE ARTISTS HANDBOOK of Materials and Techniques, 5th Edition, revised and updated by Ralph Mayer.
THE NATURAL WAY TO DRAW, A working plan for Art Study, by Kimon Nicolaides, Haughton Mifflin Company.

Inspirational magazines:
American Artist
The Artists Magazine
Artist’s Magazine
American Artist Workshop
Free News letter: at www.arttalk.com/freeartists.htm
Free art lessons on the Internet
www.artgraphica.net
Learn how to sketch, draw and paint.
www.interactiveartschool.com/free-art-lessons.HTML
Oil painting techniques.
www.artacademy.com
Portraits

TV Art class schedules are on the Internet:
Go to Public Broadcasting/click on Arts & Drama/All channels.
Jerry Arnell, Fine Art School- acrylic
Buck Paulson, acrylic
Bob Ross, The Joy of Painting, acrylic
Gary Spetz, Painting Wild Places, watercolor
Frank Clark, Simply Painting, watercolor

It has been a pleasure working with you. If you have any questions please don’t hesitate to email me at info@ruthsilnes.com

All contents copyright © 2008 by Ruth Silnes

----------------------------------------------------------------------------------

Friday, April 4, 2008

About Ruth

My art training started in the commercial field in the heart of the 1926 depression. I freelanced and painted nursery rhyme pictures in modern dress and children’s portraits. In middle age I studied fine art under masters: John Howard Sanden, New York; Fred (Fredden) Goldberg, San Francisco; Carl Lundberg, De Young Museum; Neven Kempthorn and Martin Levin.

San Francisco, the city where I was born, touched my heart and it became a theme for many of my early traditional works. It is also woven into later paintings of different genres.

When outer space mysteries were being unraveled and plans were being made to go to the moon I let my imagination fly free, and that became my Cosmic Consciousness period.


As an admirer of Salvador Dali, I began to see concrete things in my free-form works and my paintings became Cosmic Surrealism, followed by a phase dubbed Atmospheric Nautical, drawn from my tropical travels. These paintings are watercolors, done with soft pastel like colors, a major departure from my oil and acrylic paintings.

While living aboard my boat in San Diego, California I shared an art studio with George Walker in the Spanish Village Art Center. Later when living in San Mateo, I became a charter member and studio holder in the Twin Pines Art Center, in Belmont, until we moved up the street and changed the name to 1870 Art Center.


Wednesday, April 2, 2008

Upcoming Book


Written and Illustrated by Ruth Silnes

Did you ever wonder:
  • Why the arts are essential besides the giving of pleasure?
  • What makes an artist function?
  • What do the arts all have in common?
  • Do the arts really help our health, education and economy? 
      The answers are in this book
 
The book tells of the tremendous power of the arts for society, about its gifts and the benefits for children, the similarities of the arts, creativity and health, advantages for seniors, how artists' minds work, and the arts' connection with mathematics.

YOU and THE ARTS
is a short book, filled with the author's delightful illustrations and written in easy to understand language. It is for travelers, teachers, artists and art lovers.